
Implementing a Hasura GraphiQl Infrastructure
Build an AirBnB clone app with GraphiQl REST endpoints on the Hasura platform.

Senior Mobile Engineer. Breaking into #web3 while writing about it.
This article is a submission for the Hasura-Hashnode hackathon.
Well, here we go. We are going to build a simple Flutter app that will interact with Hasura Graphiql infrastructure. Hasura provides a robust and stable backend for applications with seamless integration. By simple app I mean, lets make a clone of the AirBnB app and implement its major features. We are going to include the following:
Sign up and Login
Adding of new Spaces.
Exploring spaces that have been added
Booking of a space
Here`s a breakdown of this article:
Database design
Database, Table Schema and Creation
Authorization and Permissions
GraphiQl queries and REST api
Making Api calls from our app
Database design
Our database will have 3 tables namely: app_users, spaces and bookings.
Our database rules include:
Only a registered user can add or book a space.
A user can have multiple spaces enlisted.
A user can only book a single space at a time.
With that in mind lets create our database.
Database, Table Schema and Creation
Please checkout this link for more details and explanations on how to setup the Hasura platform. After completing the above setup, we can now create our tables.
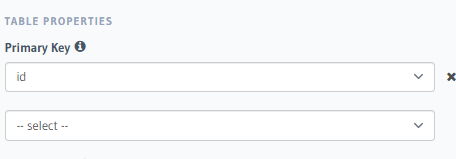
Here is the structure of our app_users table.
 Set the id column as the primary key as shown below
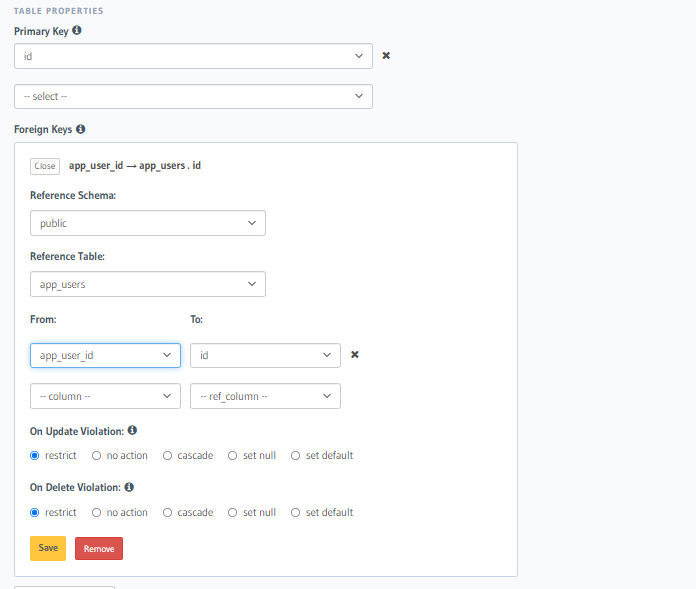
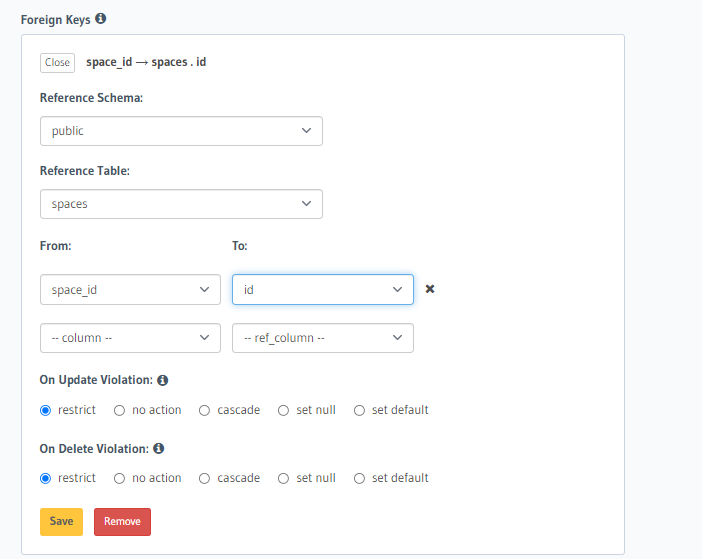
Next we create the spaces table, which will have a foreign key linking a row to a specific user. Also set the id column as the primary key as shown previously.

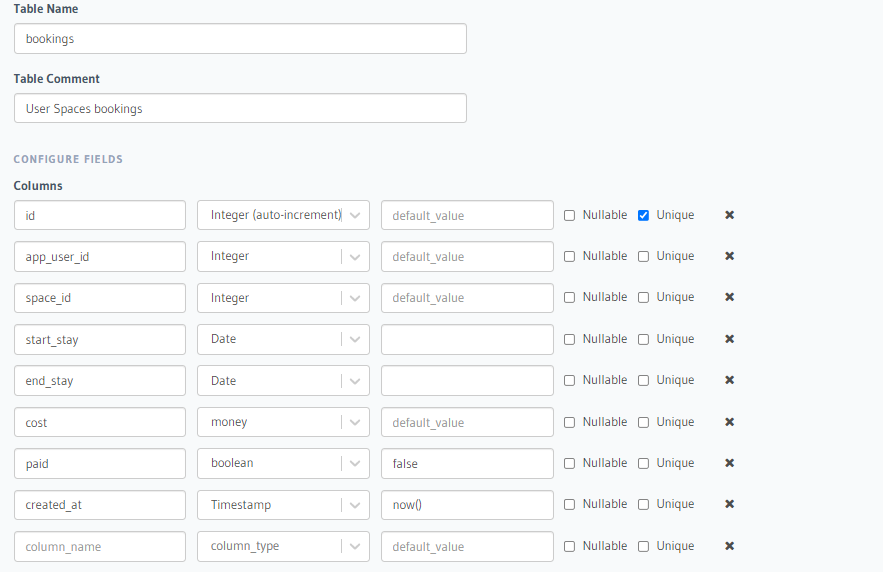
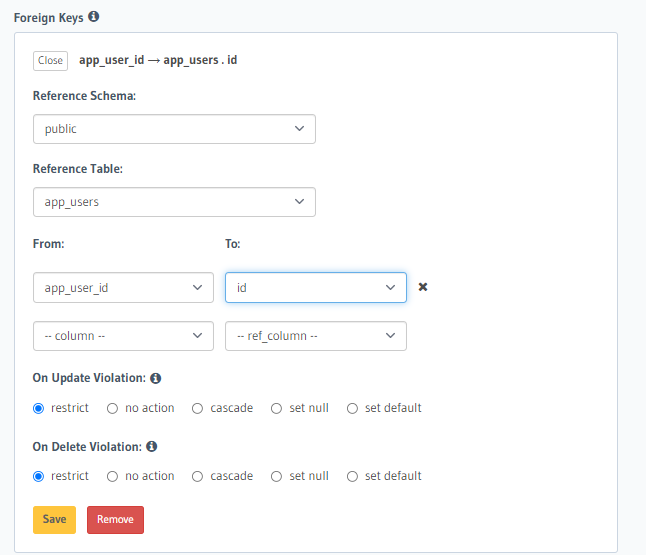
Finally we create the bookings table, which will have two foreign keys. One to reference the app_users table and the other to reference the spaces table. Also set the id column as the primary key as shown previously.
Authorization and Permissions
Permissions are used to enforce who has what kind of access to our data and what operations they can do with the data. For our app we have two permission roles: public and user .
public
Only insert and select a user.
Only select enlisted spaces
user
Has full access to database
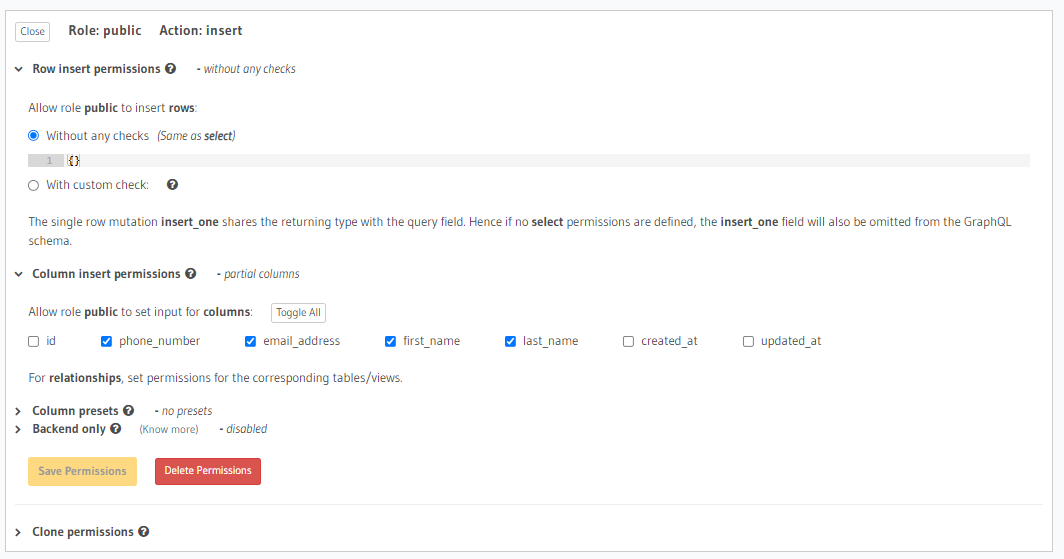
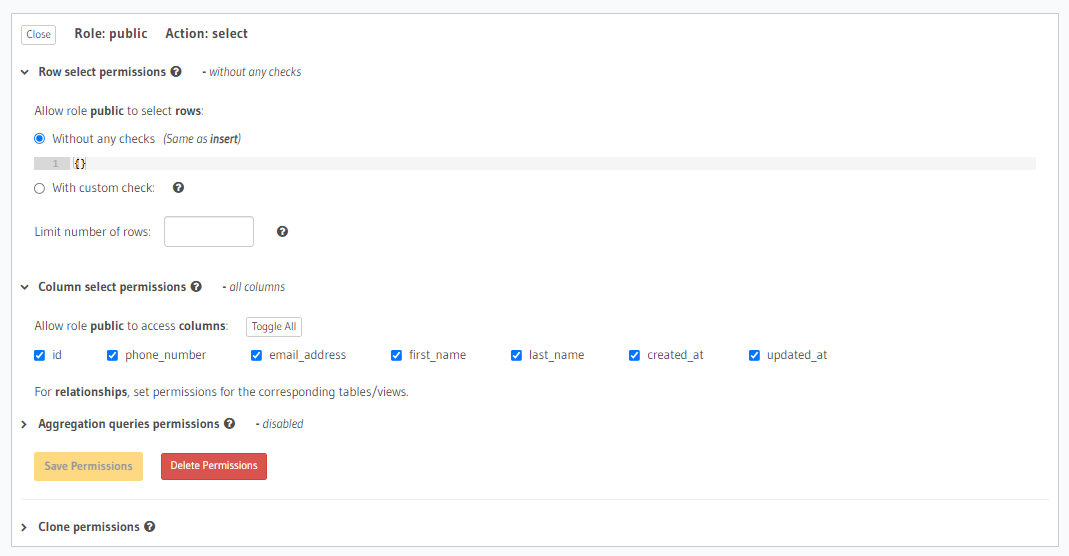
Head over to the app_users table and click on the permissions tab. Currently there should be a single role which is admin. The admin role has full access to the database.
Add a new role public with the following permissions for insert and select:
Head over to the spaces table and onto the Permissions tab. The new role public will have been created already with all permissions denied. Make the following changes on the select permissions.

Next we add the user role. Click on the Permissions tab on any of the tables. Add the new role with full access to insert, select, delete and update operations. Perform this action on all tables. You should have something close to this afterwards:

GraphiQl queries and REST api
Register new user Here is our graphiql mutation to register a new user. A user can choose to use their phone number or email address to register on the app. With that in mind, we need to create two mutations to handle that.
Phone Registration
mutation MyMutation($phone: numeric,$first_name: String,$last_name: String){
  insert_app_users_one(object: {first_name: $first_name, last_name: $last_name, phone_number: $phone}) {
    created_at
    email_address
    first_name
    last_name
    phone_number
    updated_at
    id
  }
}
Email Registration
mutation MyMutation($email: String,$first_name: String,$last_name: String){
  insert_app_users_one(object: {email_address: $email, first_name: $first_name, last_name: $last_name}) {
    created_at
    email_address
    first_name
    last_name
    phone_number
    updated_at
    id
  }
}
With the mutations above we can create REST endpoints at this location register-app-user-email and register-app-user-phone which will accept POST requests. With that we can gracefully register new users.
Login a user
Since the email address and phone number are unique, any of them can be passed from the client and when a record is matched we return a user object. We can then create a REST endpoint to access this query at login-app-user which will accept POST requests.
query MyQuery($email: String,$phone: numeric) {
  app_users(limit: 1, where: {
_or: [
{email_address: {_eq: $email}},
{phone_number: {_eq: $phone}}
]
  }) {
    email_address
    created_at
    first_name
    id
    last_name
    phone_number
    updated_at
  }
}
Adding a New Space
Any logged in user can create a new space which other users can explore. To enable this we setup a REST endpoint at new-space which will execute the following mutation.
mutation MyMutation($name:String,$app_user_id:Int,$cost_per_night:money,$description:String,$images:String,$latitude:String,$longitude:String,$location:String,$availability:Boolean) {
  insert_spaces_one(object: {app_user_id: $app_user_id, cost_per_night: $cost_per_night, description: $description, images: $images, latitude: $latitude, location: $location, longitude: $longitude, name: $name,availability:$availability}) {
    app_user_id
    availability
    name
    longitude
    location
    latitude
    images
    id
    description
    created_at
    cost_per_night
  }
}
Explore Page
The apps explore page displays spaces that have been created by all users and are available for booking. We also set a limit on the number of spaces we will get back. Lets setup a REST endpoint at explore-spaces which will give us a result after executing the following query.
query MyQuery {
  spaces(limit: 20, where: {availability: {_eq: true}}) {
    name
    longitude
    location
    latitude
    images
    id
    description
    created_at
    cost_per_night
    availability
    app_user_id
    app_user {
      email_address
      first_name
      last_name
      phone_number
    }
  }
}
Check Space availability and User eligibility
The query below should return a single space if its available or an empty array if none is found. The bookings array should be empty for the user to be eligible.
query MyQuery($space_id:Int,$date:date) {
  spaces(where: {id: {_eq: $space_id}, availability: {_eq: true}}) {
    id
  }
  bookings(where: {end_stay: {_gte: $date}}) {
    id
  }
}
Book a Space
The mutation below inserts a single row on the bookings table and also updates the space availability status.
mutation MyMutation($app_user_id: Int, $cost: money, $end_stay: date, $space_id: Int!, $start_stay: date) {
  insert_bookings_one(object: {app_user_id: $app_user_id, cost: $cost, end_stay: $end_stay, paid: false, space_id: $space_id, start_stay: $start_stay}) {
    id
    end_stay
    app_user_id
    cost
    created_at
    paid
    space_id
    start_stay
  }
  update_spaces_by_pk(pk_columns: {id: $space_id}, _set: {availability: false}) {
    id
  }
}
Making Api calls
The functions making the api calls will be built as below. Please checkout this Repository for the rest of the code implementation.
  @override
  Future<dynamic> login({required String? phone,required String? email}) async {
    log.i('$phone $email');
    return await _post(loginUri, body:jsonEncode({
      'email':email ?? '',
      'phone':phone?? 0
    }) , headers: {'X-Hasura-Role': 'public'});
  }

  @override
  Future<dynamic> signup(
      {required String phone,
      required String email,
      required String fName,
      required String lName}) async {

   return await _post(
    email.isNotEmpty ? signupUriEmail : signupUriPhone,
      body:jsonEncode(
     email.isNotEmpty ?   {
      'email':email,
      'first_name':fName,
      'last_name':lName
    } :  {
      'phone':phone,
      'first_name':fName,
      'last_name':lName
    }
    ) , headers: {'X-Hasura-Role': 'public'});
  }

  @override
  Future addSpace({required ListedSpace space}) async {
    return await _post(
    newSpaceUri,
      body:jsonEncode(space.toJson()) , headers: {'X-Hasura-Role': 'user'});
  }

  @override
  Future exploreSpaces() async {
    return await _post(
      exploreSpacesUri,
      body:'' , headers: {'X-Hasura-Role': 'user'});
  }

  @override
  Future checkSpace({required spaceId, required date}) async {
    return await _post(
      checkSpacesUri,
      body:jsonEncode({
      'space_id':spaceId,
      'date':date,
    }), headers: {'X-Hasura-Role': 'user'});
  }

  @override
  Future bookSpace({required BookSpace space}) async {
    return await _post(
    bookSpacesUri,
      body:jsonEncode(space.toJson()) , headers: {'X-Hasura-Role': 'user'});
  }
Thats all for today guys. I hope you enjoyed reading this as I did writing and exploring the Hasura GraphiQl infrastructure. Please share this article and also leave a comment if you have any🧿.
Here is the link to the Flutter implementation repository.
Here is a quick video of how it works.
Goodbye👋👋👋


